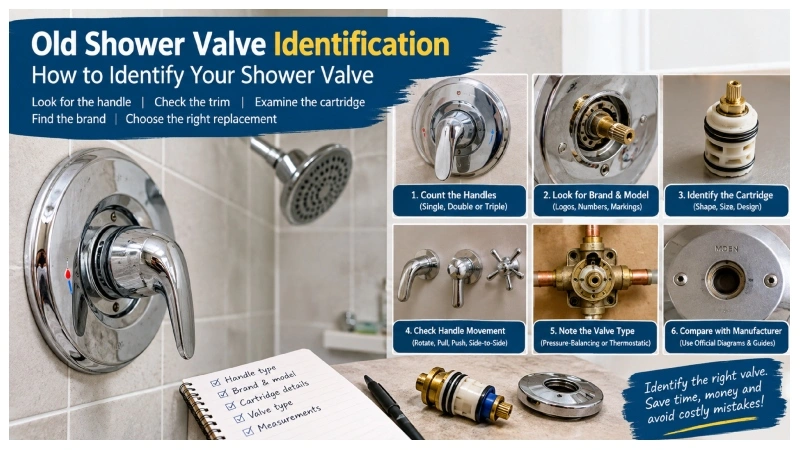
Identifying an old shower valve can be surprisingly difficult. The handle may have no visible brand name, the trim could have been replaced years ago, and the actual valve may sit behind a tiled wall where you cannot see it.That does not mean you need to replace the entire plumbing system.In many cases, you can identify an old shower valve by examining the handle, trim plate, cartridge, valve layout, and the way the controls operate. Getting the identification right matters because replacement cartridges and trim kits are often designed for specific valve platforms.This guide explains how to approach old shower valve identification step by step, including what to look for before buying replacement parts.
What Is a Shower Valve?
A shower valve is the plumbing component behind the wall that controls water flow and temperature. The visible handle and decorative plate are usually called the trim.
Old Shower Valve Identification distinction is important.
You may have a new-looking handle attached to a decades-old valve. Conversely, an older-looking trim kit may be fitted to a relatively modern valve. Manufacturers such as KOHLER design trim and valve systems as separate but compatible components, so identifying the valve platform can be more useful than simply matching the appearance of the handle.
The valve itself is normally connected to the home’s hot and cold water supplies and may also feed a showerhead, tub spout, or diverter.
What Makes Old Shower Valve Identification Difficult
Older shower installations often contain a mixture of parts from different periods.
For example, imagine a bathroom that was renovated in 2005. The original valve might date from the 1980s, while the handle and escutcheon were replaced during the renovation. Looking only at the visible trim could therefore lead you to the wrong replacement cartridge.
Another common problem is that manufacturers have produced several cartridges for similar-looking valves. Moen’s official shower cartridge guide, for example, lists multiple cartridge families for single-handle, two-handle, three-handle, Moentrol, and transfer-valve systems.
That is why appearance alone should not determine which part you buy.
Begin by Counting the Shower Handles
The easiest first step is to count the controls.
One handle
A single handle usually controls both temperature and water flow. Depending on the valve design, moving the handle from side to side may adjust temperature, while pulling or rotating it controls flow.
Old Shower Valve Identification type commonly uses a cartridge or pressure-balancing mechanism.
Two handles
Two-handle showers normally have separate hot and cold controls. The system may use compression-style valves, cartridges, or other internal mechanisms depending on its age and manufacturer.
Three handles
A three-handle arrangement often includes separate hot and cold controls plus a central diverter that directs water between the showerhead and tub spout.
The number of handles provides a useful starting point, but it does not identify the exact valve by itself.
Examine the Handle and Escutcheon
Remove the handle carefully if you are comfortable doing so. Before taking anything apart, shut off the water supply if the work could disturb the valve or cartridge.
Look for:
- A manufacturer’s name or logo
- Model numbers
- Small stamped numbers
- Screws with unusual arrangements
- Handle shape and mounting method
- The number and position of screw holes in the escutcheon
- The shape of the valve opening
- Any markings around the stem
Take clear photographs before removing components. Photograph the front of the shower, the handle, the trim plate, and the exposed valve area.
Those pictures can become extremely useful when comparing your installation with manufacturer parts diagrams.
Check How the Shower Handle Works
Handle movement provides another valuable clue.
Ask yourself:
- Does the handle rotate?
- Does it pull outward?
- Does it move up and down?
- Does the handle slide from one side to the other?
- Does one control regulate temperature while another controls volume?
- Is there a separate diverter for the tub and shower?
Do not force an old handle simply to discover how it moves. Corroded components can break, and a damaged stem can turn a simple identification job into a plumbing repair.
The operating pattern can sometimes narrow down the cartridge family. Moen’s own identification guidance specifically uses handle operation alongside cartridge images to help identify shower cartridges.
Check Behind the Handle
If the handle comes off, inspect the exposed area carefully.
You may find the strongest identification clues around the cartridge retaining nut, stem, or valve body. Older valves can have mineral deposits, corrosion, paint, or years of accumulated grime, so clean only what you can safely access.
Do not assume the cartridge’s appearance is enough, though. Two cartridges can look similar while fitting different valve bodies.
If you remove the cartridge, take measurements and photographs first. Keep the old part until you have confirmed the replacement.
Identify the Cartridge When Possible
For many older showers, the cartridge provides the most useful route to identifying the valve.
A cartridge is an internal component that controls the passage and mixing of water. It can wear out over time, causing symptoms such as:
- A dripping shower after the valve is turned off
- A handle that becomes difficult to move
- Poor temperature control
- Water leaking around the handle
- Hot or cold water that does not respond correctly to the control
Manufacturers may use different cartridge designs across generations of valves. Moen, for example, documents several shower cartridge numbers, including 1225, 1222, 1212, 1213 and others for different systems.
KOHLER also has different cartridge sizes and designs. Its identification guidance notes that its ½-inch and ¾-inch cartridges can be distinguished using the shape of the cotter pin.
That illustrates why measuring or comparing the actual internal component can be more reliable than guessing from the exterior.
Search for Manufacturer Markings
Once you have gathered the physical clues, look for the manufacturer’s name.
Common brands found in residential plumbing include manufacturers such as Moen, Delta, KOHLER and others. Do not assume the brand of your bathroom’s sink faucet is necessarily the brand of the shower valve.
A house can contain plumbing fixtures from several manufacturers.
If you find a model or part number, search the manufacturer’s official documentation rather than relying solely on photographs from online marketplaces. Manufacturer parts diagrams and service information can help confirm whether a cartridge belongs to a particular valve platform.
For example, KOHLER’s current documentation separates pressure-balancing valves, thermostatic valves, volume controls and transfer valves into different product categories.
Pressure-Balancing vs. Thermostatic Valves
When researching an older shower, you may encounter the terms pressure-balancing and thermostatic.
They are not interchangeable.
A pressure-balancing valve responds to changes in hot and cold water pressure to help prevent sudden temperature changes. A thermostatic system is designed to regulate temperature more precisely and can use a separate control for temperature and another for water volume.
The visible controls can sometimes provide clues about which type you have, but the valve’s internal design and manufacturer documentation provide stronger confirmation.
Old Shower Valve Identification distinction becomes particularly important when replacing a valve or selecting compatible trim.
Don’t Match Parts by Appearance Alone
One of the most common mistakes during old shower valve identification is buying a replacement because it looks identical in an online photograph.
A handle can look almost exactly like another model while using a different stem or cartridge.
The same problem occurs with trim plates. Hole spacing, valve depth, stem length and mounting arrangements can affect compatibility.
If you are replacing only the decorative trim, identify the valve platform first. Some manufacturers specifically design trim systems around particular valve bodies, meaning an attractive trim kit is not necessarily compatible with the valve already installed behind your wall.
What If You Cannot See the Valve?
You may not need to open the wall.
Start with the visible components and gather as much information as possible:
- Photograph the entire shower.
- Photograph the handle from several angles.
- Remove the handle if it can be done safely.
- Photograph the stem and cartridge area.
- Record the number of handles.
- Note how each control operates.
- Look for brand names and stamped numbers.
- Measure the relevant components if necessary.
- Compare the information with manufacturer documentation.
If the valve is completely inaccessible and the trim provides no useful clues, a plumber may be able to identify it from the exposed stem or cartridge without opening a large section of the wall.
When Should You Replace the Valve Instead?
Identification does not always mean replacement.
If the valve body remains in good condition and a compatible cartridge or service part is available, repairing the existing valve may be much simpler than replacing the entire assembly.
However, a valve body that is badly corroded, damaged, leaking inside the wall, or incompatible with the renovation you want may justify replacement.
Replacing an in-wall valve is a considerably larger project than changing a cartridge. It may require access through the wall, new connections, soldering or other plumbing work, and repairs to the finished wall afterward.
For that reason, confirm the actual problem before deciding that an old valve needs to come out.
A Practical Example
Suppose you have a single-handle shower with a chrome lever installed in the 1990s. The handle drips when you turn the water off.
Instead of immediately buying a new shower valve, remove the handle and escutcheon carefully. You discover a cartridge with a manufacturer’s marking and photograph its retaining arrangement.
You can then compare those details with the manufacturer’s service information.
If the valve body is sound and the correct cartridge remains available, replacing the cartridge may solve the problem while leaving the existing plumbing behind the wall untouched.
That is the real value of accurate old shower valve identification: you can often diagnose the repair before committing to a major renovation.
Final Checklist for Identifying an Old Shower Valve
Before ordering a replacement part, make sure you have recorded:
- Number of handles
- Handle movement
- Brand name or logo
- Model or part numbers
- Cartridge shape
- Stem appearance
- Escutcheon screw arrangement
- Valve opening dimensions
- Cartridge dimensions, if removed
- Whether the shower has a tub spout or diverter
- Whether the system appears pressure-balancing or thermostatic
The more of these details you can confirm, the less likely you are to order the wrong part.
Final Thoughts
Successful old shower valve identification is less about guessing the brand from a handle and more about collecting several pieces of evidence. The handle, trim, valve layout, cartridge, markings and operating pattern all tell part of the story.
If you identify those details before shopping for replacement parts, you can often avoid unnecessary wall removal and expensive trial-and-error purchases.
When in doubt, keep the original cartridge and take detailed photographs. Manufacturer documentation, plumbing supply specialists and experienced plumbers can then use those physical clues to narrow down the exact valve and compatible repair parts.For more information visit our site daily.